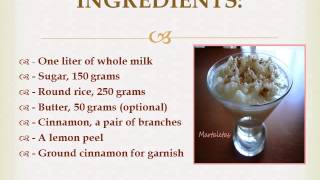
Rice Pudding: A Passive Voice Culinary Adventure
¡Prepárense, amantes de los postres! Vamos a embarcarnos en una aventura culinaria, pero no de cualquier tipo. Hoy, aprenderemos a preparar un delicioso arroz con leche, pero con un giro: lo haremos utilizando la voz pasiva en inglés. Sí, has leído bien. Olvidémonos por un momento de los "I" y los "You" y adentrémonos en el mundo gramático-gastronómico de la voz pasiva. ¡Prepárense para un festín de palabras y sabores!
The Ingredients: A Symphony of Flavors
Antes de comenzar nuestra odisea culinaria pasiva, necesitamos los ingredientes. Estos son los actores principales de nuestra receta, y aunque no realizarán la acción directamente, su presencia es fundamental. Reúne lo siguiente:
- 1 taza de arroz de grano medio: El protagonista indiscutible.
- 4 tazas de leche entera: La base cremosa de nuestra delicia.
- 1/2 taza de azúcar: Para ese toque dulce e irresistible.
- 1/4 cucharadita de sal: El contrapunto perfecto al dulzor.
- 1 cucharadita de extracto de vainilla: Un toque aromático que elevará el sabor.
- Canela en rama: Para un aroma embriagador.
- Pasas: Opcional, pero ¡qué delicia con pasas!
A Deeper Dive into the Ingredients:
El Arroz:
La elección del arroz es crucial. Un arroz de grano medio cocinará uniformemente y absorberá la leche sin volverse pastoso. Evita el arroz de grano largo, ya que puede resultar demasiado seco.
La Leche:
La leche entera proporciona la cremosidad necesaria. Si prefieres una versión más ligera, puedes usar leche semidescremada, pero ten en cuenta que la textura final podría ser ligeramente diferente.
The Method: A Passive Voice Masterclass
Ahora, ¡a cocinar! Recuerda que estamos utilizando la voz pasiva en inglés, así que olvídate de "I stir" o "You add". En su lugar, usaremos estructuras como "The rice is added" o "The milk is heated".
Step 1: The Rice is Prepared
First, the rice is rinsed thoroughly under cold water. Any excess starch is removed. This step prevents the pudding from becoming gummy.
Step 2: The Milk is Heated
Next, the milk is heated in a medium saucepan over medium heat. The sugar and salt are added. The mixture is stirred until the sugar is dissolved completely.
A Note on Sugar:
The amount of sugar is adjustable to your preference. If you prefer a less sweet pudding, reduce the amount of sugar. Taste as you go and adjust accordingly.
Step 3: The Rice is Added to the Milk
Now, the rinsed rice is added to the simmering milk mixture. The cinnamon stick is added as well.
Step 4: The Pudding is Simmered
The mixture is brought to a gentle simmer. Then, it is cooked, stirring occasionally, until the rice is tender and the milk has thickened, approximately 20-25 minutes. This process requires patience. The heat should be low to avoid burning the milk.
Step 5: The Vanilla is Incorporated
Once the rice is cooked, the cinnamon stick is removed. The vanilla extract is stirred in.
Step 6: The Pudding is Cooled
Finally, the rice pudding is removed from the heat and allowed to cool completely. The raisins, if using, are added at this stage. The pudding is then refrigerated for at least 2 hours to allow the flavors to meld and the pudding to set.
Serving Suggestions: A Culinary Symphony
Once cooled, your delicious rice pudding is ready to be served. You can serve it chilled or at room temperature. A sprinkle of cinnamon on top adds a nice touch. You can also garnish it with a dollop of whipped cream or a drizzle of honey.
Table 1: Serving Variations
| Variation | Description |
|---|---|
| Classic | Served chilled, with a sprinkle of cinnamon. |
| Festive | Topped with whipped cream and a cherry. |
| Honey-Kissed | Drizzled with honey. |
| Nutty Delight | Topped with chopped nuts (almonds, pecans). |
FAQs: Answering Your Burning Questions
Q: Can I use different types of milk?
A: Yes, you can experiment with almond milk, soy milk, or oat milk, but the texture might differ slightly from the creamy texture achieved with whole milk.
Q: How can I make it vegan?
A: Replace the cow's milk with your preferred plant-based milk and ensure that any other ingredients, such as whipped cream, are also vegan-friendly.
Q: Can I make it ahead of time?
A: Absolutely! In fact, the flavors meld better when refrigerated for a few hours or even overnight.
Conclusion: A Passive Voice Victory
And there you have it! A delicious arroz con leche prepared using the passive voice in English. We have successfully navigated the grammatical waters and emerged victorious with a sweet and satisfying reward. So, gather your ingredients, embrace the passive voice, and enjoy the fruits (or rather, the rice) of your labor. ¡Buen provecho! (or, as they say in English, "Enjoy your meal!")